A Community and Forum For Aquaponic Gardeners
My 3 bed + 1 DWC system - Cape Town - South Africa
Hi there,
As the title implies, I'm based in Cape Town - South Africa and I've learned some stuff in the last 7 weeks.
I came across the concept of Aquaponics by accident, when I misread a thread title on the adventure biking forum I frequent. I was skimming the thread titles and thought it said Akrapovics, (a type of after market exhaust). Bike forum
I was hooked at the 1st pic, a single IBC system with towers draining into the back of the GB.
A few posts down was a before and after pic showing a month of growth. Wow
I read the whole thread, 27 pages and decided to try it, as SWAMBO had been suggesting/reminding/encouraging that I make a veg garden just that morning again...
I got 3 pre-cut IBC's from a dude that had a 100 sets and had decided to build a big commercial system.
He was using a continuous flow system so there were no holes in the tanks or beds. But the beds had been cut off at the 200mm mark. I only figured out at that was a bit low later in the build.
This was the site I chose in the backyard
This is the other side of the wall. The bed with the one panel precast wall around it, is the old veg garden I was supposed to resurrect.
The Kids had dumped kitty litter in there so it was actually a toxic waste site.
The site other side showing the radio active zone and prolific weed patch.
I cut down a portion of the wall, dug out and leveled the old veg garden. I used the precast panels to pave "the site"
After a lot more work than I thought, this was what the Grow Bed site looked like after the 1st saturday.
Rack and sump site.
This is what it looked like the next day which was a public holiday.
That didn't score many points.

Bell Siphons bits
Well because I was in the box anyway, I went out with my head torch and installed all the siphons. Got to bed late. Then on the weekend, I siliconed some perspex scraps over the holes for the IBC screw on lids. One was missing the other had a crack.
On the weekend I procured some stone and shoveled it into the beds and made an error that would cost me another Saturday. I did not wash the stone before putting it into the beds but it looked cool and I didn't realize the problem at that point.
Spike cover bed rim. Note that unwashed stone waiting to bite me.
The next weekend I was able to finish off the spike covers, a big chunk of the time.
I also figured out a quick way to black out the tanks and beds without having to paint them. I bought a roll of 300mm DPC. I just taped strips of DPC around the tanks and put them back in their cradles
I also got some of the piping done.
The next day I did the supply line from the sump to the tank. I used the the cracked lid from the IBC to make a SLO.
And also make my next big error, I sized it The SLO and supply line to the beds at 32mm...
I also made some pretty cool inlet sprinklers.
Tank Piping
Here is a close up of the inlet sprinklers in action.
It was raining during the week, managed to snap this though.

When I dug out the plants and rubbish from the bed for the tank site, it had a whole lot of red grids that l the previous owner had put around the plants, probably to keep his dogs out.
I also bought the fittings to upgrade the overflow supply to the beds to 50mm,
I welded up a frame and put it next to the tank as a planting and work table.
Here it is in action
Bed 3 - 22-6-2014.jpg |
Bed 2 - 22-6-2014 |
Then after all the activity I had to sit and watch while the chemistry sorted itself out. To pass the time, not a lot of it, I built a worm bin Also found a local red wiggler supplier R50 for 200 (US$ 4.65 AUS$ 4.98) So while passing the rest of the time waiting for the water chem to come right, I got to thinking...
I have a left over IBC well most of one. It's missing the top 200mm. I was going to use it as a rain water tank but the mozzies would love that. Decided to add a Deep Water Culture tank to compliment the grow beds.
Figured it would be a nice addition and it will boost the water volume by just under a 1000 liters. Figured it wouldn't be too much work ... right There was a last piece of precast wall left adjacent to the beds and I figured it would make a nice platform site for the DWC tank. Sorry for the hazy pic. Cut the post and removed the panels.
The ground behind it was full of small rocks... Heavy going on the digging
After a quite a bit of digging in that infernal rock infested patch. Sustained by a few beers.
I finally got the 4 precast posts left over from the rest of the wall dug in and leveled as a base for the wall panels that would make up the base.
I was quite chuffed because that means there has been no waste. I reused the whole wall Had to varnish the planks (ugh I hate painting stuff) because it's not treated wood. Hopefully it'll last a bit. The panels in place to for the tank base. Put the tank into position after a bit of a wash.
The fish arrived this weekend after 42 days of fish-less cycling. They are orechromis mozambicus hybrids.
Hard lesson The problem was one fish blocked a feed to the beds and the other 2 feeds couldn't cope with the extra water so the tank backed up and over flowed. So this is how far manged to get since early May when I first accidentally crossed paths with Aquaponics And the plants grew a bit in a month too so I must be doing something right |
Replies to This Discussion
-
Permalink Reply by Alex Veidel on
-
Nice!!! I made the same mistake with the fingerlings and lost a couple through my SLO. Can I see a picture of the grid you made for your outflow?
-
Permalink Reply by Mr. Python on
-
Hey Alex,
Actually I only fleetingly thought of snapping a pic then didn't, I was trying to prevent anymore deaths.
My SLO was a 50mm 90° bend into the lid of one of the IBCs. I heated the end that poked through a cutout in the top of the lid and melted the 2 together. In the final install this lid portion hovered 31mm above the tank bottom. Didn't think anything of it till it started sucking up fish. Hence the urgent need for a grid to fill this gap.
The This is a sketchup representation.
It was a 31mm slice out of an old bucket. I cut grooves all the way round with an angle grinder. When i slipped it under the SLO it fit perfectly. The slo actually sucked down and pinned it in place. The grooves are 2mm wide.
Hope you can do something similar to sort your issue out. I watched closely to make sure the tank did not start backing up because of the restricted flow - all good.
-
-
Update time
This is what my system looks like at the mo. 8/9/2014I learned a bit about the actual plants today.
That mizuna lettuce in the 1st bed just exploded then shot this tall stalk and grew flowers.
I was apparently supposed to harvest more aggressively to force it to regrow.
I did cut it back today to see what happens.
The other 2 beds seem to be doing well.
I have been harvesting salads most eveningsHere's the 3rd bed.
What's next?
From an earlier post you'll remember I started to put together a DWC tank.
I have been busy with work and haven't found a cheap closed cell foam supplier for the raft.
I didn't want to use polystyrene because it doesn't appear to age well where it gets direct sun and the African sun is not for sissies.
Plus builders warehouse only had 20mm sheets and by the time I bought the right glue to put 2 sheets together, it would be cheaper to get foam.
I was sitting in my spot, listening to the water and contemplating things, when this piece of pipe that has been on my to do list since we moved in 4 years ago catches my eye.
The previous owner must have intended to make a grey water system or something but nothing actually drains out of the pipe - Huh?
It is just a very badly laid piece of 40mm pvc pipe that's been irritating me.I popped out and got 8x 45° bends.
Chopped out the pipe and cut it up.
The piece lying on the table was all that was left.
I made a frame float and overlaid it with an old carpet protector I scollied from work for another project but never used. That has also been lying around bugging me.
I just needed to cut off about 60mm on one end and round the corners.
I tested it to see how it would work.
It was seriously buoyant, i had to apply a fair amount of force to get the hole thing to go below the surface.
The carpet protector unfortunately sagged onto the water in the middle.
So I thought some more and remembered that I had salvaged some armaflex off some Aircon piping we were stripping out.
Was going to use it to insulate some piping for the solar heater I'll build.
I figured this stuff must float, I'll span some underneath I have plenty anyway.
I made 2 "balloons" out of it. Cabletied one end shut and blew it up a bit then tied the other end. It seems to have held pressure over night.
I hope the stuff is waterproof.
That was as far as I got with the float.
Need to blacken the underside to keep sun out of the tank.
And I obviously need to cut holes in.
My plan to hold the plants it to use a 40mm slice of a pool noodle.
I'll slice this "disk" to the middle and then that'll squeeze into the cutout in the raft deck with the plant clamped at the end of the slice.I then worked on an air supply.
I got 4 small air stones and an air pump for R67 ($6) bucks.
Spent a bit of time making a stainless steel wire stiffener to hold them in an H shape on the bottom of the tank.I took a visit to plastics warehouse and got one of those clip top lunch box jobbies to put the Air pump in.
Works well I did the same with my temp gauge for the tank.
Attachment:
Next I need to pipe it in to the existing system.
-
-
I got my DWC (deep water culture) tank plumbed into the system this weekend, the levels all work and the grow bed siphons seem to be cycling fine still.
This is a pic of the beds this morning (18/8/2014) - It's starting to grow faster than we can eat it. I've cut about 20 salads worth of leaves, using a rate of R20/salad the system has paid back R400 bucks in the few weeks we have been harvesting.If I factor in the input costs of food and power, the system would have paid itself off in another 9 months shorter once I get the Tomatoes and bell peppers going in the DWC tank - even shorter when we can chow down on a fish or 2.
Also included a pic of the SLO pickup I made for the DWC tank. Made it from an old bucket. I also managed to re-use most of the piping that got "wasted" when I had to upgrade the supply line to 50mmand from underneath
Now just to finish the raft, have everything I need now just need time. I have all the materials I need to finish the raft just need to apportion the time. Speaking of which I'm gonna go and paint the underside of that translucent sheet black to keep the sun out of the DWC tank.
-
-
Made a bit of progress with The DWC tank today.
I 1st had heat the float and press in some indentations to accommodate the plumbingI had to move the armaflex floats a bit so that they were directly above the air stones that way the bubble go to both sides of the float. Added 2 short ones for extra support.Needed to drill the holes, I got the spacing a bit out so the last row is a bit closer than i wanted. Mostly the holes are 200mm apart 100mm from the edges.Fixed the deck to the floatDWC - Raft underside
The top sideand dropped it in the tank. Worked well.
Then I cut a few slices of the Neoprene noodle I skollied from Sondor plastics. They gave it to me for free because they didn't have the colour I asked for.
The inserts were really easy to make. Just slice a disk off then make a slice in to the center. I did make the ones for the tomatoes a bit taller for more support.DWC - Tomatoes
They're ready to get insertedThis is what it look like by the end of the day
DWC - Plants going in
DWC the days effortHere's a closeup
Don't know what plant this, I used masking tape for my lables and they all fell off.
To make matters worse the when I planted the seed a I dropped the grid I was using to carry the planted out seed trays. I half caught it but a couple got mixed up
-
-
Update time

My daughter had a cooking thing for school and decided to do Leek Chicken... at the last minute of course.
Then went to the shop to get the parts for the concoction, she came back in a huff with a fair amount of stomping to say they didn't have leeks.
It was so cool to say there were leeks in the AP.
She did chirp that they might still have some pee in them, but being between the bottle and the label, she did agreed to accept my humble contribution.
Back to the system, well close..
I've been quite busy at work so not a lot of time to do much else, I'm the HR dude and times are tough so we all know what that means.
Anyway, a mate of mine on the bike forum is going nuts buying stuff to build his own AP system. He posted that he had bought some of those peat-moss pellet jobbies.
I commented on the coolness of the acquisition and that I didn't know we could get them in South Africa. Till then I'd only seen them on overseas forums.
Next thing he sent me some in the post - man I was stoked, when the post office slip arrived I even got up early to go get 'em.![[IMG]](http://i932.photobucket.com/albums/ad169/Mr-Python/Aquaponics/PeatmossArrival.jpg)
![[IMG]](http://i932.photobucket.com/albums/ad169/Mr-Python/Aquaponics/Peatmossinprocess.jpg)
![[IMG]](http://i932.photobucket.com/albums/ad169/Mr-Python/Aquaponics/PeatmossInjected.jpg)
I planted some pimento pepper seed and some bell peppers seeds - Collected from actual peppers.
Will be interested to see if anything sprouts.
Not sure if the stuff we get in the shops is genetically engineered to the point where the seeds are sterile is that possible??
-
-
![[IMG]](http://i932.photobucket.com/albums/ad169/Mr-Python/Aquaponics/TrellisBits.jpg)
![[IMG]](http://i932.photobucket.com/albums/ad169/Mr-Python/Aquaponics/DWCTrellisinprocess-1.jpg)

-
-
It been 12 days since my last confession.
I've been doing snippets of work, a few minutes here a few minutes there.
Today I finished off the great Tomato trellis.
It's made from old electrical conduit I salvaged.
It's basically 2 frames with some overhead struts.I'm not sure if the Heinz tomato's I have are the vine type or the bush type.
Either way it's a bit like what Adam said to Eve the 1st time "Stand back girl, not sure how big this thing's gonna get"
Some of the research pics I saw had plants growing round the green house roof.Across the back frame, I have Twine stretched across and the plants are secured to that.
-
-
Here's a progress pic of the Deep Water Culture tank.
I have neglected to take pics for a while, some of the plants have already been through their life cycle already.
I have cleared everything to make space for the tomatoes which have exploded. Especially the bush in the middle.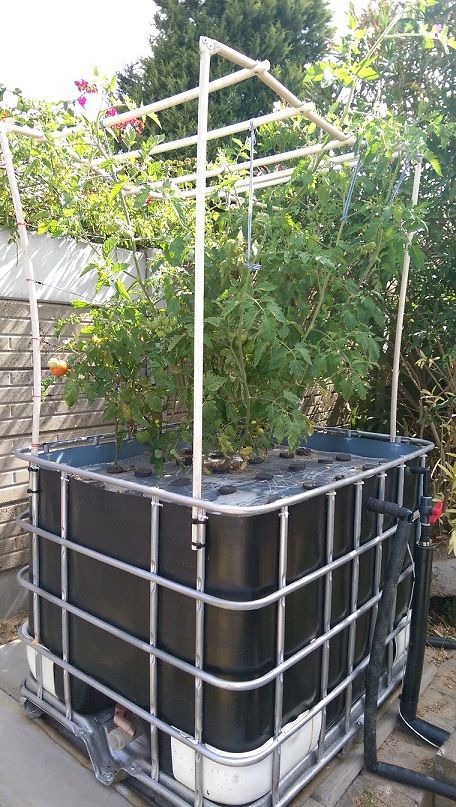
© 2025 Created by Sylvia Bernstein.
Powered by
![]()